Cavity wall insulation (CWI)
The concept of building walls comprised of two skins of bricks with a cavity was introduced in some late Victorian buildings, but first became widespread in the 20s and 30s. The air gap did provide some insulation, but the idea of using an insulation material within the cavity was introduced in the 70s, however such energy saving measures did not become part of building regulations until the 90s.
Usually a PIR or expanded polystyrene board is used to fill approximately 50% of the cavity so the remaining empty 50% is available for airflow.
In the 1970s and 1980s grants became available to retrofit cavity insulation into older houses. In a retrofit it is not possible to fit boards (without demolishing a lot of the wall) so either insulation was injected via holes drilled into the outer skin. This was usually either polystyrene beads or urea-formaldehyde wool.
We are aware that some contractors may have done poor work, either not injecting enough or not sealing air bricks properly so that the insulation leaked out, either via an air brick in the outer skin or via the corresponding air brick or gap in the inside skin into the space below a suspended floor.
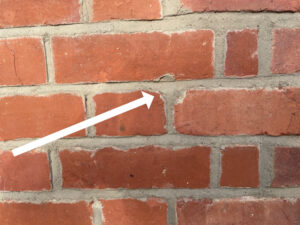
If you live in a property with cavity walls that were retrofitted with insulation, you can usually tell because the holes drilled into the walls would have been filled but often are still noticeable – see photo.
It’s worth noting that an EPC inspector will take note of such tell tale signs that insulation was carried out in the past and will assume it was done, however there is no guarantee it was done properly or still has its integrity because of this. EPC inspections do not do any kind of invasive survey that would reveal the actual state of the insulation.
Damp problems due to (incorrectly) retrofitted cavity insulation
As noted above some of the cavity insulation (especially when cowboy installers were attracted by the grant schemes) was poorly done. This can cause or exacerbate damp issues for various reasons:
- Any cold spots caused by gaps in insulation can cause condensation
- Properties in exposed areas (by the coast or top of hills) can be subject to a lot of wind-blown rain. Certain types of insulation would act like a sponge and retain this moisture in the cavity. See here for more info and map
More about cavity wall issues:
Case study: unblocking cavities
Loft insulation
Insulation can either be added immediately above the room ceilings (cold loft) or just below the roof tiles and battens, between the rafters (warm loft).
Warm loft
This means that the insulation is placed immediately below the roof battens so that all the loft area beneath can either be efficiently heated if required or else it will take heat from the rooms below. A warm loft is only really useful if you are using the loft space regularly enough as a room, either as storage, home office, playroom etc. Otherwise heat from the main part of the house still leaks into this area, and if the room is not used you would be much better off retain that heat within the main house.
Cold loft
This is much cheaper and easier as a DIY project (provided you have access to the loft) and probably more efficient than a warm loft for the house in general if you rarely or never use the loft. Insulation is laid between the joists that form the floor of the loft, ie immediately above the ceiling of the rooms below.
Again there were grants in the 80s/90s to have this done. Generally the joist were 4 inches (100mm) and so 100mm of insulation was laid between them. Modern building regs and EPC require at least 200mm [check] so is worth topping up older works by adding another layer. There is a limit to how much thickness is required for good insulation, topping up to more than 300mm is probably a waste of time in the UK climate.
Note that the joists in typical loft on an older house may only be about 100mm, and never intended for supporting the same load (furniture, fittings, multiple people etc.) as might be involved in a living space, yet can still be very useful for storage. Be especially careful not to tread between the joists, ie directly onto the ceiling boards or lathes.
You can lay insulation between the joists and board over that. Fibreglass or mineral wool rolls can be used, however there are now more eco friendly products such as Non-Itch or Supasoft, both of which are made from recycled plastic and (as the name implies) much nicer to work with than fibre glass. Ideally you may want it thicker than the joists so you could add extra timbers across the joists before boarding. [check – does this need building control just for storage space?]
Multifoil
Possibly a better solution to achieve good insulation without adding timber is to use something like Superquilt or Ecoquilt Expert multifoil. This is a much thinner but very efficient material. You would lay this across the joists and then recess between the joists and staple it so that it hangs about half way between the ceiling and the boards that you lay onto the joists. This system relies on a sealed airgap of about 50mm above and below. In simple terms, this creates a “radiant barrier” which reflects heat back downwards into your home and coldness back upwards.
Many lofts did have some insulation fitted back in the 80s/90s but is very much worthwhile topping up to 200 – 300mm. Even if you are boarding a small area you can do this by adding some extra timber to the existing joists create more space for the added insulation. Alternatively use Superquit as above but to create the air gap you would need to remove the old insulation.
Underfloor insulation
Some properties may have easy access to the space underneath a suspended floor via a crawlspace or by exposed floorboards. Unless the boards are tongue and groove, it is possible to inslutale by taking up only a few of the boards, e.g. every fifth or sixth board (see Insulation case studies DIY underfloor insulation)
Underfloor insulation is absolutely necessary when installing underfloor heating in order to ensure the heat is used for the room above, not the ground below.
Exterior wall cladding
This is usually not so common as a retrofit installation as it can adversely alter the appearance of a building that was not originally designed for it, as well as being very expensive. A common method is to add 50mm (2″) of foam board insulation and then cover this over with a cosmetic cladding such as timber or brick slips. On existing buildings you would need to pay special attention to the look of doors, windows and eaves. It is unlikely to get planning permission in conservation areas.
Interior wall cladding
This is generally recorded for solid walls. For cavity walls there can be problems due to condensation occurring if not correctly fitted. Again, foam board or polystyrene can be used, but to be effective needs a thickness of at least 25mm and probably more like 50mm which will have a serious impact on the size of the room. It will need decorating and skirtings/coving to be moved and refitted.
More breathable solutions include wood fibre board and insulating lime plaster such as Limco and Cornerstone.
There is a modern hi-tech alternative – Aerogel or Spacetherm – which has very high insulation properties and is only about 10mm thick. This is available as a blanket that can be used behind regular plasterboard but is now also available with a stiff backing and can be glued directly to a wall. This sounds like the ideal solution but there is always a catch – yes it is incredibly expensive at about £80 per square metre.
Theoretically it could replace existing plaster so have no impact on the room size. ideally it should also be fitted behind skirtings to avoid cold spots causing potential damp issues due to condensation.
Insulating plaster
Various renders and plasters with insulating properties are available. In particular lime plasters are very good for this purpose as lime is “breathable” as opposed to the more modern gypsum. If you need a room replasered in an older property, then it is worth thinking about using a lime plaster with insulating properties such as Cornerstone or Limco.
It’s worth noting that when original lime plaster has been skimmed with gypsum, this can cause problems both with the integrity of the plaster itself and also with dampness. Lime needs to be slightly moist anyway or it turns to dust and can break up behind the skim of gypsum. Alternatively the gypsum can seal in any moisture that accedes the normal small amount the lime needs.